|
|
|
Categories
|
|
Information
|
|
Featured Product
|
|
|
 |
|
- PROTECTION OF EYES FROM LASER BEAM DURING SERVICING
- PRECAUTION TO REPLACE OPTICAL BLOCK
- SPECIFICATIONS
- CD MECHANISM DISASSEMBLY INSTRUCTION
- ELECTRICAL MAIN PARTS LIST
- TRANSISTOR ILLUSTRATION
- BLOCK DIAGRAM - 1 (MAIN/FRONT)
- BLOCK DIAGRAM - 2 (CD)
- BLOCK DIAGRAM - 3 (TUNER : G, EZ)
- BLOCK DIAGRAM - 4 (TUNER : U, HE)
- WIRING - 1 (MAIN : G, EZ)
- SCHEMATIC DIAGRAM - 1 (MAIN : G, EZ)
- IC BLOCK DIAGRAM - 1
- WIRING - 2 (MAIN : HE)
- SCHEMATIC DIAGRAM - 2 (MAIN: HE)
- IC BLOCK DIAGRAM - 2
- WIRING - 3 (MAIN : U)
- SCHEMATIC DIAGRAM - 3 (MAIN : U)
- IC BLOCK DIAGRAM - 3
- WIRING - 4 (FRONT)
- SCHEMATIC DIAGRAM - 4 (FRONT)
- IC BLOCK DIAGRAM - 4
- WIRING - 5 (PRO - LOGIC)
- SCHEMATIC DIAGRAM - 5 (PRO - LOGIC)
- WIRING - 6 (CD)
- SCHEMATIC DIAGRAM - 6 (CD)
- WIRING - 6 (DECK )
- WIRING - 7 (PT)
- FL GRID ASSIGNMENT & ANODE CONNECTION
- IC BLOCK DIAGRAM - 5
- IC DESCRIPTION
- ADJUSTMENT - 1 < TUNER/DECK >
- PRACTICAL SERVICE FIGURE
- ADJUSTMENT - 2 < CD >
- TEST MODE
- CD TROUBLESHOOTING
- MECHANICAL EXPLODED VIEW 1/1
- MECHANICAL PARTS LIST 1/1
- TAPE MECHANISM EXPLODED VIEW 1/1
- TAPE MECHANISM PARTS LIST 1/1
- CD MECHANISM EXPLODED VIEW 1/2
- CD MECHANISM PARTS LIST 1/2
- CD MECHANISM EXPLODED VIEW 2/2
- CD MECHANISM PARTS LIST 2/2
- SPRING APPLICATION POSITION
- ACCESSORIES/PACKAGE LIST
- REFERENCE NAME LIST
There are currently no product reviews.
 ;
This service manual have great value... Recommended A+++++++
;
This service manual have great value... Recommended A+++++++
;
Great price, Quick delivery, the document was very usefull A+++++++++++++++
;
Great price, Quick delivery, the document was very usefull A+++++++++++++++
;
Great price, Quick delivery, the document was very usefull A+++++++++++++++
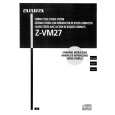
4. How to reassemble the TURN TABLE. (Fig-7)
1) Push LEVER TT in the direction of �C�, and put in the TURN TABLE 5CD. (Fig-7) After reassembly, one of the TURN TABLE DISC TRAY (can be either one of the five disc trays) must be aligned with TURN TABLE 5CD. (Fig-8) That is, having no gap difference between the TURN TABLE 5CD and the TRAY 5CD. When reassembling the TURN TABLE 5CD, it is acceptable facing any CD number (1-5).
*
ALIGN
C
LEVER TT
TRAY 5CD
Fig-7
TURN TABLE 5CD
Fig-8
8
 $4.99 Z-VM27 AIWA
Owner's Manual Complete owner's manual in digital format. The manual will be available for download as PDF file aft…
|
|
|
> |
|