I am very happy with the owner's manual. I bought a used Casio and was so relieved that I was able to get a hold of a owner's manual. It was very easy to download the manual and I had no problems with printing it. Thank you! Nancy Whalen
great site, the most easy and fastest way to find the manual you need, no 5 star because the manual was only available in german, but I speak german as well so no problem for me.
thanks for this download i got a pioneer bdp-lx70a blu-ray player and it had no manual i search everywhere on the internet and came across owner-manuals.com and i found that it was so easy to find and downloaded from this site if i ever need a manual again this would be the first place that i would come too thanks guys
Text excerpt from page 5 (click to view)
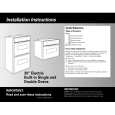
Door reversal directions
1. Disconnect from the electricity supply. 2. Remove all loose items, including food, store food in a cool place. 3. Gently lay the fridge/freezer on its back with the top held away from the floor by 5-8 cm (2-3 inches) of packing. 4. Remove the feet (B). 5. Remove bottom hinge (A). 6. Remove the freezer door by releasing it from the middle hinge (H). 7. Unscrew the middle hinge. 8. Slide out the fridge door from pin (G), unscrew pin (G) and then screw it down into the hinge hole provided on the opposite side, after having removed the small plugs (I) which should then be fitted on the opposite side. 9. Remove the plastic blanking screws from the left hand hinge position, refit to the right hand hinge position. 10 Refit the fridge door and replace the middle hinge to the left hand side. 11.Replace the door and bottom hinge (A) on the opposite side. 12.Refit the feet (B).
G
H
D715
Fresh food refrigeration
B To obtain the best performance, do not store warm food or evaporating liquids in the refrigerator; cover or wrap the food, particularly if it has a strong flavour. Do not cover the shelves with any protective material, such as paper, cardboard or plastic, which may obstruct the air circulation. To help you use your refrigerator correctly, here are some more useful hints: Raw meat (beef, pork, lamb & poultry): wrap in polythene bags and place on the glass shelf above the salad drawers. Meat can only be stored safely in this way for one or two days at the most. Fruit & vegetables: these should be thoroughly cleaned and placed in the salad drawers. Butter & cheese: these should be placed in special airtight containers or wrapped in aluminium foil or polythene bags to exclude as much air as possible. Milk bottles: these should have a cap and should be stored in the bottle rack on the door.
A B
Warning
Attention
After completion of the door reversing operation, check that the door gasket adheres to the cabinet. If the ambient temperature is cold (i.e. in Winter), the gasket may not fit perfectly to the cabinet. In that case, wait for the natural fitting of the gasket or accelerate this process by heating up the part involved with a normal hairdryer on a low setting.
If using the appliance with the salad drawer removed, please ensure the vent in the back wall of the appliance is not obstructed.
D756
Positioning the door shelves
The door shelves can be easily removed for cleaning. Gently ease the shelf in the directions shown.
PR261
D419
Positioning the inner shelves
The walls of the refrigerator have runners so that shelves can be positioned as desired.