|
|
|
Categories
|
|
Information
|
|
Featured Product
|
|
|
 |
|
|
There are currently no product reviews.
 ;
Last week I bought a second hand Panasonic AG-7500 SVHS Hi-Fi Video Cassette Recorder. It is a professional machine with many video and audio options. I feared it would be a huge quest to find a manual. I was delighted when I found owner-manuals.com. After payment I received the file to download the next day already. The quality is great. I am very happy. Thanks!
;
The owner's manual/operating instructions that I purchased was the original factory document and it was in at least three and maybe more languages. I no longer have it because I sold the tape recorder and included the owner's manual/operating instructions and a service/repair manual that I bought on ebay for the new owner.
;
This manual is very useful. Because pioneer sx-q180 is unhandy to use without manual.
;
Manual was destroyed and this purchase made it possible to recover my manual . It was easy to down load and smooth to use thanks .
 ;
Turns out this was not the manual i was looking for. The concertmate 670 keyboard i have is a "Realistic" model made for Radio Shack and none of the diagrams on the owners manual i received matches up. HOWEVER, I must say the service Owners Manual provides was fast and efficient by being available online. The manual was in good readable condition and easily downloaded.
6gb33034.fm5 Page 72 Monday, June 10, 2002 4:47 PM
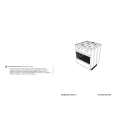
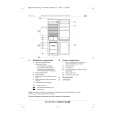
HOW TO OPERATE THE .REEZER COMPARTMENT
Making ice cubes � .ill the ice cube tray 3/4 with water and place it at the bottom of the freezer compartment. To speed up the ice making process, place the tray on the bottom of the first drawer (as shown in the figure) and not on the ice pack rack (if provided). � If the tray sticks to the bottom of the compartment, do not use pointed or sharp instruments to detach it.
.
HOW TO DE.ROST THE .REEZER COMPARTMENT
Defrost the freezer compartment once or twice a year, or when the ice on the walls reaches a thickness of about 3 mm. If possible, defrost the freezer when it is nearly empty. 1. 24 hours before defrosting, press the fast freeze button (4). The yellow LED lights up. This brings the foods to the lowest possible temperature. 2. Remove the food from the freezer, wrap in a newspaper and group together in a cool place or in a portable cooler. 3. Disconnect the appliance from the mains power supply. 4. Remove the ice-cube tray. 5. Remove the baskets. 6. Pull out the defrost water drain from the base of the freezer compartment. 7. Leave the freezer compartment door open. Remove the drain plug (depending on model), place a container (or the lower basket, depending on model) under the drain to collect the defrost water as shown in the figure. 8. Note: In order to avoid permanent damage to the freezer interior, do not use sharp or pointed metal instruments to scrape off ice; do not heat the freezer compartment artificially. Any damage to the appliance resulting from failure to observe these instructions is not covered by the guarantee. 9. Clean the freezer compartment using a sponge dampened in a solution of warm water and neutral detergent. Do not use abrasive products. 10. Rinse and dry carefully. 11. Reconnect the appliance to the power supply. 12. Refit the drain in place and reposition the baskets. 13. Before putting the food back in the freezer compartment, press the freeze button (4) again and leave it ON for approx. 3 hours. .or models without freeze button (4), turn the thermostat knob (5) to position 3 for approx. 4 hours before putting food back in the freezer. After 4 hours turn the thermostat knob to the habitual position. Note: Any increase in temperature of frozen food durin defrosting can shorten its storage life.
72
|
|
|
> |
|