|
There are currently no product reviews.
 ;
Manuals were delivered promptly and were correct as advertised. No issues with the download link which was provided promptly after everything was processed. Very pleasant experience
;
Paid for service manual & got the download fast - worth a visit if you need a service manual
;
It's the manual, I am searching for. Now I am able to repair my Braun A501.
 ;
Great service manual. Unfortunately on page no. 41 there are some details which i can't read.
;
Wonderful service... doubt that I could have made the repairs to my turntable without this service manual. Great help!
Well worth the price paid!
1
2
3
4
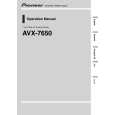
- Removing the Display Assy (Fig.7)
Display Assy
A
Holder
1 2 3
Remove the two screws and then remove the Holder. Remove the three screws and then remove the Cover Unit. Remove the four screws.
1
1
3
3
Disconnect the connector and then remove the Display Assy.
B
3 2 2 2
3
Cover Unit
Fig.7 - Removing the Monitor PCB (Fig.8)
1
C
Straighten the tabs at two locations indicated.
1
1
2
Remove the screw.
Disconnect the connector and then remove the Monitor PCB.
D
2
Monitor PCB
Fig.8
Note: Tighten the screws with the panel in warped state as shown in the photograph below. Otherwise, it will be difficult to install Detach Grille Assy to Panel Assy.
E
F
88
AVX-7600/EW
1 2 3 4
|