|
|
|
Categories
|
|
Information
|
|
Featured Product
|
|
|
 |
|
|
There are currently no product reviews.
 ;
Please tell us what you think and share your opinions with others. Be sure to focus your comments on the product. You will receive $2.00 of store credit for Your review.
;
Please tell us what you think and share your opinions with others. Be sure to focus your comments on the product. You will receive $2.00 of store credit for Your review.
;
Good copy and great customer service! There was some confusion with my order and it was resolved promptly!
;
Having bought a pre-owned Sony FM stereo tuner through eBay, it came without any manuals. It soon became clear that to get the best from this excellent tuner I needed a decent manual because much of the operation was not intuitive to a newboy to hi fi like me. I managed to download the official Sony multi-lingual manual from Owner-Manuals.com with no problem at all - a really quick and easy service. I'm very glad I did because I found out all the operations of the tuner and was then able to not only set it up quickly but also to get much more from it that poke-and-hope trialling would ever achieve. In my book $4.99 very well spent.
;
This manual is immaculate in it's accuracy. Everything is written very clearly and easy to understand. Written by a professional who wants to convey a clear and easy to understand message!!
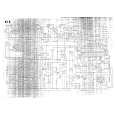
1-1-3.Precaution 1. Setting the Switch Unless otherwise specified, set the switches as follows and perform adjustments without loading cassette. 1. POWER switch (MA-345/346 board) .................... CAMERA 2. NIGHT SHOT switch (Lens Block) ................................ OFF (Night shot model) 3. DEMO MODE (Menu display) ....................................... OFF 4. DIGITAL ZOOM (Menu display) ................................... OFF 5. STEADY SHOT (Menu display) .................................... OFF 6. DISPLAY (Menu display) ................................. V-OUT/LCD
Yellow
7. 8. 9. 10. 11.
FOCUS switch (MF-8500) .................................... MANUAL PROGRAM AE (CF-60/61 board) .................................. Auto BACK LIGHT (CF-60/61 board) .................................... OFF PICTURE EFECT (CF-60/61 board) .............................. OFF 16 : 9 WIDE (Menu display) ........................................... OFF
2. Adjusting Procedure Adjust in the given order.
Cyan
Color bar chart standard picture trame H
Green White Magenta
Blue
Electronic beam scanning frame
Red
0 ± 0.1 msec
Magenta Yellow Green White Cyan Blue Red
CRT picture frame
AB
A=B
BA Enlargement
V Fig. b. (TV monitor picture)
Fig. a. (Video output terminal output wavefom) Difference in level
A
B
Adjust the camera zoom and direction to obtain the output wavefom shown in Fig. a and the TV monitor display shown in Fig. b.
Fig. 5-1-5.
3. Subject 1) Color bar chart (Standard picture frame) Adjust the picture frame as shown in Fig. 5-1-5. if adjustments are performed using the color bar chart. (Standard picture frame) 2) White pattern (Standard picture frame) Remove the color bar chart from the pattern box, and insert a clear chart in its place. (Do not perform zoom operations during this time.) 3) Chart for flange back adjustment Combine a white A0 size (1189 mm x 841 mm) paper to a black one, and make the chart shown in Fig. 5-1-6.
White 841 mm Black
1189 mm
Fig. 5-1-6.
Note : Use the non-reflecting and non-glazing vellum paper whose size is more than A0, and make the boundary between white and black to be smoothly flat.
5-5
|
|
|
> |
|