|
|
|
Categories
|
|
Information
|
|
Featured Product
|
|
|
 |
|
|
There are currently no product reviews.
 ;
A comprehensive Operating and Service Manual. All schematics are complete and easy to read. The PCB drawings and complete parts list are very helpful. I would definitely recommend this manual.
;
SCANNING OF HIGH QUALITY
VERY, VERY HIGH VELOCITY DOWNLOAD
VERY GOOD PRICE,
TRUE SATISFIED, THANKS
;
Genuine Toshiba owner's manual. Couldn't really ask for more. And written in understandable English in contrast to a few recent experiences I have had with manuals for other equipment other than Toshiba but made in China and written in "Chinglish"!
;
I purchased a vintage Sony mixer off eBay and within the hour was able to locate and purchase the manual for it.I mean really,where else can you find a manual for a product made in 1983!? It was easy to find and purchase/download the manual I needed.I will use this site again for other equipment I have! Great site!
;
manual de usuario perfecto y completo de buena calidad de impresion y muy detallado ideal !
Underno circumstancesare the surface burner assembliesto be taken apart for cleaning.The surface burner assemblycan be removed to clean the burner box area. FreestandingRange Only: The two surfaceburnerassembliesare securedin place during transportation ithscrews.Oncethe rangeis w installed,hesescrewsmay be removed allowquick t to and easyremovalof the burnerassemblies,
The porcelainon the burner is durable but may gradually lose its shine due to usage and high temperatures. The sealed surface burners are securedto the cooktop and are NOT designed to be removed by the consumer. Select modelsfeaturetwo special SUPER HIGH SPEED sealedburnerslocatedat the right-front nd left-rear.Use a theseburners quicklybringwaterto a boil andwhen to usinglargerpans.See information ratingplate,located on onthe lowerrangefrontframe, to determineifyour appliance featurestheseburners.
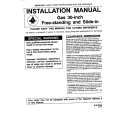
Lip
--
--
_- Portdirectly belowignitor
To remove: Allow the burner assemblyto cool. Lift up cooktop. Graspthe burner assemblyand rotate it slightly toward the left to release the two tabs on the assembly, Then lift the assembly and pull towardthe back of the cooktop until the air shutter ends on the assemblyrelease from the valves. To replace: Insertthe air shutterends on the burner assembly overthevalvesand lowerthe assemblyinto place.Be suretosecurethetwo tabsonthe burner assemblyintothetwo slotson the burnersupportbracket whichis mounted the burnerboxbottom.(NOTE:If the to tabs are not properly insertedintothe slots, the assembly may rockandthe burnersmay notlightproperly.)
Clean burner cap after each use especially if a spillover occurs. A soiled burner may result in improper ignition or an unevenflame. When cleaningthe sealed surface burner, use care to prevent damageto the ignitor.If a cleaningcloth should catch the ignitor,it could be damaged or broken. The surface burner will not light if the ignitor is damaged, broken, soiled or wet. The burner will also not light if the ports,especially smallportlocateddirectly the belowthe ignitor, re blocked.See page17 forcleaninginstructions. a NOTE:Whenone surface burneristurnedto the LITE position,allfourignitors willspark.Oncethe burnerlights, turnthe knobto the desiredflame size.
|
|
|
> |
|