|
|
|
Categories
|
|
Information
|
|
Featured Product
|
|
|
 |
|
|
There are currently no product reviews.
 ;
Actually, I was looking for this information for 3 years!...now thanks to you, the manual is on my hands and of great help, cause I understand now where I was doing wrong connections and wires...excellent, I'll be back to you if in need, thank you.
 ;
This manual covers the main equipment features only. While it also includes the procedure for saving and loading from the now long obsolete memory cards it does not mention the how to operate with the optional floppy drive interface so I am still at a loss about how to use this! Note that there is a separate manual covering the MIDI interface and programming via the keyboard, not included in this download. You will also need to get hold of this if you want to use the MIDI interface properly. Basically there is little difference between this manual and the free to download manual for the similar PR60 model.
;
Good list of manuals. I found a very rare one and easily get. Should be promptly to download, as we must to wait hours even after confirmed payment.
;
The manual was properly scanned and perfectly readable. The only small problem is that I couldn't use my dear Ctrl + F to find a word I needed.
;
Nothing wrong with the manual or the delivery - came to me the same day I ordered it. But afterwards I realized that I ordered the wrong manual. Probably better with the Quick start - version. So maybe it would be better if we could see a list with inhold for each manual before ordering?
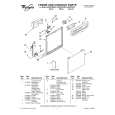
Mounting
Before Mounting
A depth of at least 43 mm is required for flush mounting. Measure the depth of the area where you are to mount the speaker, and ensure that the speaker is not obstructing any other components of the car. Keep the following in mind when choosing a mounting location: � Make sure that nothing is obstructing around the mounting location of the door (front or rear) where you are to mount the speaker. � A hole for mounting may already be cut out of the inner panel of the door (front or rear). In this case, you need to modify the board only. � If you are to mount this speaker system in the door (front or rear), make sure that the speaker terminals, frame or magnet do not interfere with any inner parts, such as the window mechanism in the door (when you open or close the window), etc. Also make sure that the speaker grille does not touch any inner fittings, such as the window cranks, door handles, arm rests, door pockets, lamps or seats etc.
Montage
Avant le montage
Une profondeur d�au moins 43 mm est nécessaire pour un montage encastré. Mesurez la profondeur de l�emplacement où vous souhaitez installer le haut-parleur et assurez-vous que ce dernier ne gênera aucun des autres éléments du véhicule. Veuillez toujours garder les remarques suivantes en mémoire lorsque vous choisissez un emplacement pour l�installation : � Vérifiez qu�il n�existe aucun obstacle autour de l�emplacement où vous allez installer le haut-parleur dans la portière (avant ou arrière). � Un orifice peut déjà avoir été pratiqué dans le panneau interne de la portière (avant ou arrière). En pareil cas, il ne vous reste plus qu�à modifier la plaque. � Si vous installez ce système de haut-parleurs dans la portière (avant ou arrière), vérifiez que les bornes, le bord ou l�aimant des haut-parleurs ne gênent pas les éléments internes comme le mécanisme de lève-vitres de la portière (lorsque vous baissez ou remontez la vitre), etc. Vérifiez également que la grille du haut-parleur ne touche aucun des équipements internes comme les manivelles des vitres, les poignées de portières, les accoudoirs, les vide-poches des portières, les lampes ou les sièges etc.
Montaje
Antes del montaje
Para montar el altavoz de modo que quede empotrado en la ubicación de montaje se requiere una profundidad mÃnima de 43 mm. Mida la profundidad del área donde desee montar el altavoz y asegúrese de que no obstruya ningún otro componente del automóvil. Cuando elija la ubicación de montaje, recuerde lo siguiente: â�¢ Asegúrese de que no haya ningún objeto cerca de la puerta (delantera o trasera) donde desea montar el altavoz que pueda impedir su instalación. â�¢ Es posible que en el panel interno de la puerta (delantera o trasera) ya exista un orificio para montar el altavoz. En este caso, sólo deberá modificar el tablero.
� Si desea montar este sistema de altavoces en la puerta (delantera o
trasera), asegúrese de que los terminales, el marco o el imán del altavoz no interfieran con los componentes internos como, por ejemplo, el mecanismo de la ventanilla de la puerta (al subir o bajar la ventanilla), etc. Asegúrese también de que la rejilla del altavoz no esté en contacto con accesorios internos como, por ejemplo, los picaportes de las ventanillas y las puertas, los reposabrazos, los compartimentos para guardar objetos situados en las puertas, las luces o los asientos etc.
Parts List
1 2
Liste des pièces
3
Lista de las piezas
4 5 6
2m �2
ø4 � 30 �8 �8 �2 �2
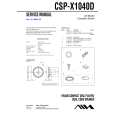
Mounting from the car interior
Montage depuis l�intérieur de l�habitacle
Montaje desde el interior del automóvil
1
Mark the 4 bolt holes and make them 3.3 mm* in diameter. Marquer les 4 orifices des boulons et percer des trous de 3,3 mm* de diamètre. Marque los orificios de los 4 pernos y hágalos de 3,3 mm* de diámetro.
2
Remove the grille net. Retirez le filet de la grille. Extraiga la red de la rejilla.
* When using 4 = 5 mm * Avec 4 = 5 mm * Si utiliza 4 = 5 mm
6
1
ø126 mm
5
c
ø3.3 mm*
3
Black-striped cord Cordon rayé noir Cable con raya negra * White cord � Left speaker Grey cord � Right speaker * Cordon blanc � Haut-parleur gauche Cordon gris � Haut-parleur droit * Cable blanco � Altavoz izquierdo Cable gris � Altavoz derecho
4
Speaker Haut-parleur Altavoz
3 2* 4
5
Power amplifier, etc. Amplificateur de puissance, etc. Amplificador de potencia, etc.
2
Door panel Panneau de porte Panel de la puerta
5
Press and insert the edges of the grille net. Pousser et insérer les bords du filet de la grille. Presione e inserte los extremos de la red de la rejilla.
How to remove the grille net Comment retirer le filet de la grille Cómo extraer la red de la rejilla
6
5
6 5
|
|
|
> |
|