|
|
|
Categories
|
|
Information
|
|
Featured Product
|
|
|
 |
|
|
There are currently no product reviews.
 ;
perfect! you just sent to me the copy in Italian witout even my specification!!!! so you are really smart cooperative and efficient. To my opinion the best place all over to get a manual of electronics!!!!
;
Well Well Well!!!! Good manual perfect for my hobby!!! As Before you have done a very well done work!!!! Thank you
;
Super nice! Good to have a manual in digital format.
;
Great job supplying the manual.
Many of these products weerepretty obscure, so it was great that you had
the manual for it!
;
Great manual, would not have been able to operate my machine without it!!
James Dawson August 18, 2012
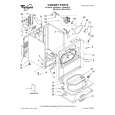
Empotrado en los muebles de cocina
Zona inferior del empotramiento
La cavidad debe tener las dimensiones indicadas en fig. 4 y 5. En el caso de que el mueble en el cual se va a instalar el horno/encimera estuviera cerrado en la parte dorsal, se deberán realizar unos cortes en la parte superior e inferior de esa zona, que servirán para paso de cables para la conexión a la red de los propios aparatos, para paso de tubos de gas, etc. y también para ventilación de dicho mueble. El horno debe instalarse en las condiciones descritas anteriormente, tanto de medidas como de ventilación y deberá utilizare un mueble en el cual las colas utilizadas para el pegado de las láminas de recubrimiento soporten una temperatura de 100°C.
20 5 60 0 5 60 3 20
60
60 480
0
60
5
400
620 100
595
5 560
64
600
Fig. 4
Fig. 5
Colocación y montaje
Antes de montar la encimera en el hueco del plano superior del mueble, posicionar la guarnición adhesiva hecha a propósito sobre el borde inferior del plano de vidrio. Es importante fijar esta guarnición sin interrupciónes, y cuidando que los extremos se unan sin montarse, por evitar infiltraciónes de lÃquido debajo de la encimera. 1) Quitar las rejillas, los casquetes y las coronas de los quemadores, y poner al revés la encimera. 2) Posicionar sobre el borde inferior del plano de vidrio la guarnición adhesiva, según la Fig. 6. 3) Colocar la encimera en el hueco, presionando hacia abajo hasta hacerla asentar en el mueble, según la Fig. 7. La encimera se centra sóla.
30
Fig. 6
A
Fig. 7
FO 2321
A) Guarnición 12
30
FO 2108
|
|
|
> |
|