|
|
|
Categories
|
|
Information
|
|
Featured Product
|
|
|
 |
|
|
There are currently no product reviews.
 ;
The only reason I gave this less than 4 stars, is because it shouldn't take 24 hrs to have the download available. I was surprised to find that I had to wait until the next day to be able to download the manual that I paid for.
The manual itself is the correct manual.
 ;
Excellent replacement for original Owner´s Manual. I am totally satisfied!
;
Great service. Manual is as advertised and delivered when promised.
;
Perfect quality, highly appreciated service !!!
Fast delivery of the download info, no issues at all. Recommended E-manual shop !!!
;
hi owners manual- crew,
i am very satisfied about the trade with you.
if i need some other manuals, i will contact you again.
thanks
frank kappler
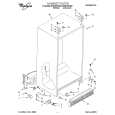
To replace the covers: 1. Replace metal cover support on wall supports in front section of cabinet. 2. Fii back corners of cover frame into notched supports on liner walls, then lower front of cover frame into place. 3. Slide back of glass insert into place, then lower front.
Adjusting
the crisper
humidity
control
You can control the amount of humidity in the moisture-sealed crisper. l The control can be adjusted to any setting between LOW and HIGH. l LOW (open) lets moist air out of the crisper for best storage of fruits and vegetables with skins. l HIGH (closed) keeps moist air in the crisper for best storage of fresh, leafy vegetables.
Adjusting
the meat drawer
Use control
temperature
Cold air flows against the meat drawer through an opening between the freezer and the refrigerator. This helps keep the meat drawer colder than the rest of the refrigerator for better storage of meats. Slide the control to let more or less cold air through.
to adjust meat drawer tsmperatura
Removing
the snack
bin
To remOve the snack bin: 1. Slide snack bin straight out to the stop with an even, constant motion. 2. Lift the front. 3. Slide bin out the rest of the way. 4. Replace in reverse order.
Pull out to Ihe
stop, lift the front and pull again.
10
|
|
|
> |
|