|
|
|
Categories
|
|
Information
|
|
Featured Product
|
|
|
 |
|
|
There are currently no product reviews.
 ;
Great service. Manual is as advertised and delivered when promised.
;
Perfect quality, highly appreciated service !!!
Fast delivery of the download info, no issues at all. Recommended E-manual shop !!!
;
hi owners manual- crew,
i am very satisfied about the trade with you.
if i need some other manuals, i will contact you again.
thanks
frank kappler
;
Full Panasonic service Manual, as described, no problems
;
This place is amazing. Got our manual in a few hours. Print quality is excellent. Even the manufacturer didn't have this manual. The price was excellent. How many more stars can I give them? More than satisfied.
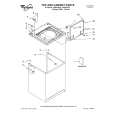
Remove and empty the storage bin: l If the ice dispenser has not, or will not be used for a week or more, l If a power failure causes ice in the bin to melt and freeze together; l If the ice dispenser is not used regularly.
1. Pull the coverrng slide it to the rear.
panel
out from the bottom
and
3. Lift the front of the storage bin. Pull it out. 4. Empty the bin. Use hot or warm water to melt the ice if necessary. Never use anyfhlng sharp to break up ice in the bin, This can damage the bin and dispenser mechanism. 5. Wash with mild detergent. Rinse wellDo not use harsh or abrastve cleansers or solvents. 6. When replacing the bin, make sure it is pushed in all the way. Push the signal arm down to the ON position to restart ice production, The night light uses a heavy-duty IO-watt bulb. When it burns out, purchase another from your dealer A swatch underneath the panel turns the light on and
nff I, V!
FV1-1
d L,&$
III
OFF/ON Signal Arm �
Night
light
Switch IU II
I
2. Lift the signal arm so it clicks Into the OFF position, Ice can still be dispensed, but no more will be made.
Changing light bulbs.. .
Before removing a light shield for cleaning or for replacing a bulb, unplug the refrigerator. Use opplionce bulbs only
Pull Out at the Botto
Light bulbs behind refrigerator and freezer control consoles: -Pull bottom of panel straight out. -Lift top of panel off supports. -Replace with a 40.watt appliance bulb. - Replace panel in reverse order.
light bulb behlnd Ice maker: - Remove the ice bin (see ice maker instructlons page 1 01. -Replace with a 40-watt appliance bulb. - Replace ice bin 9 Light bulb above crisper: -Pull top of the light shreld away from the back wall. - Ltft shield off base supports. - Replace with a 40.watt appliance bulb. - Replace shield in reverse order. l Night light in dispenser area: (See above.) - Reach for the bulb through the dispenser area. - Replace with a heavy-duty IO-watt bulb.
l
11
|
|
|
> |
|