|
|
|
Categories
|
|
Information
|
|
Featured Product
|
|
|
 |
|
|
There are currently no product reviews.
 ;
Absolutely perfect! I've been trying to understand how to use all or at least some of the features of the receiver and especially the remote.
;
Copy of genuine owners/operators manual, very useful
;
The manual was a perfect match and was exactly what I was looking for. I'm very satisfied with my purchase.
;
Thank you for having the manual I needed for an older model Aiwa stero I had found on Ebay --- I wanted the Aiwa because I had tapes and cd's but I did not have a manual as to how to operate the system... I found what I needed and it has enabled me to set the system up for my enjoyment.
;
I wished detailed information of the JBL S310 and here I found it! Very happy with the service from this site!
EN
MENU
23
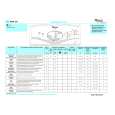
Character Generator
You can enter an original title of up to 18 characters.
ACCESS MENU SCREEN
1 2
PROGRAM AE select dial
Turn the PROGRAM AE select dial to any position except AUTO LOCK, then press MENU.
ACCESS CHARACTER SET MENU
Press + or � to move the highlight bar to �Set Character�, then press NEAR. The Character Set menu appears.
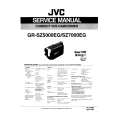
INPUT CHARACTERS
3
Gain Up Tele Macro Interval Timer Rec Time JLIP ID NO. Tally Set Character Date/Time END :MENU KEY NORM OFF OFF OFF 07 ON
Press +, �, FAR or NEAR to make the desired character blink, then press MENU. The selected characters appear at the bottom of the screen. Repeat as many times as desired (max. 18). �To select the location of the next character, press +, �, FAR or NEAR to make the row of squares blink at the bottom of the screen, then press FAR or NEAR to move the blinking cursor underneath the desired location. Press + when you�re done, and the blinking cursor returns to the character grid.
SET : MENU KEY ABCDEFG JKLMNOPQ TUVWXYZ� � �� � ���� :.,��/!? 01234567 I LI End
END CHARACTER SETTING
H R � � ¿ 8 I S � & 9
4
Press +, �, FAR or NEAR to make �End� blink, then press MENU twice to return to the normal screen.
NOTES:
� To erase a character you entered mistakenly, make �Clear� blink by pressing +, �, FAR or NEAR, then press MENU. All characters are deleted at once. Or, to erase selected characters only, first move the blinking cursor to the character at the bottom row which you want to replace, then press +, FAR or NEAR to highlight � � in the top left corner, and then press MENU. � To display the characters you have set � �Instant Titles� ( pg. 22) or �Date/Time/Character Insert� ( pg. 24). � Characters may be set only in the Record-Standby mode.
Clear
SET : MENU KEY ABCDEFG JKLMNOPQ TUVWXYZ� � �� � ���� :.,��/!? 01234567 I L I KE YOU End
H R � � ¿ 8
I S � & 9
Clear
|
|
|
> |
|