|
|
|
Categories
|
|
Information
|
|
Featured Product
|
|
|
 |
|
|
There are currently no product reviews.
 ;
I purchased the unit from a private party and the original owners manual was not available. Having the ability to download it was extremely helpful and clarified operating the equipment immensely. This is a complicated unit and without the manual I would not have been able to maximize it's potential. Thank you.
;
Being a user of older radios of many kinds, preferring them over more modern rigs, this manual was invaluable in the programming of my two. I now know for certain what the assorted buttons functions are, and am very grateful to have found this excellent site. Many thanks for your assistance, Tony.
 ;
Clear and easy to read. All details as expected. Price acceptable , and quick delivery.
;
Quick response and exactly what I was looking for and at a great fair price!
;
5 star quality on these downloadable manuals. Easy to read and all the information is there. A must when doing a custom install or needing to service your precious old school electronics.
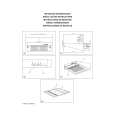
Step 2: Cabinet Preparation
� � The cabinet cutout dimensions are shown in Figure 1. When the microwave oven is installed at the end of a cabinet run, adjacent to a perpendicular wall or cabinet door, it is a good practice to allow at least 1/4" space between the side of the trim and wall or door.
Trim Kits Width (B) Height (A) Depth (C) HMT40x HMT47x All Trim Kits All Trim Kits Dimensions 28-1/2" 25-1/2" 16-3/4" 22-3/4" - 24"
�
Your microwave oven can be installed into a cabinet or wall by itself or above any of the following Bosch wall ovens: HBL43, HBN/L44 or HBN/L74. Outlet can be located anywhere within the shaded area as indicated in Figure 1.
�
¨
4"
A
¦
Outlet should be in the shaded area.
¦
Figure 1
Top of microwave shelf
Microwave Cutout
} 3" minimum
Bosch single wall oven cutout
Figure 2
4
¦
¦
B
¨
C
14"
¨
¨
¦
¦
4"
¦
¦
|
|
|
> |
|