|
|
|
Categories
|
|
Information
|
|
Featured Product
|
|
|
 |
|
|
There are currently no product reviews.
 ;
PHILIPS PE1642 Owner's Manual
Hi,
you have complet fullfilled my expectance.
Price is OK.
Robert Schmid
 ;
Came in the mail within a few hours. Gave clear instruktion on maintaines. Is of great use to have this manual in house
;
Easy to access. Clear instructions. No problems. Printed fine.
;
Great scan but please note that it is entirely in GERMAN.
;
High quality scan of the manual, very quick and easy download and very important, a truly honest price. thanks
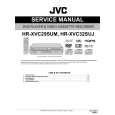
Initial Settings (continued) Clock Set
Perform clock setting only if the clock has not been set correctly by the Plug&Play setting. � Turn on the TV and select the VCR channel (or AV mode). � Slide the TV/VCR/DVD switch on the Remote to the right.
Semiauto Clock Set
You can change the host channel/D.S.T. (Daylight Saving Time)/time zone setting manually.
NOTE:
The time set previously will be erased when �AUTO CLOCK,� �HOST CH,� �D.S.T.,� or �TIME ZONE� setting is changed.
~
Set �AUTO CLOCK� to �ON.�
Preparations
Press ENTER repeatedly to move the highlight bar to �AUTO CLOCK,� then press %� so that �ON� is selected.
~ Ÿ !
Select the VCR deck.
Ÿ
Select the host channel.
Press VCR on the Remote so that the VHS indicator lights up on the front display panel.
Access the Main Menu screen. Access the Initial Set screen.
You can either select �AUTO� or enter a PBS channel number. Press ENTER to move the highlight bar to �HOST CH,� then press %� repeatedly until �AUTO� or the desired PBS channel number is selected.
Press SET UP.
NOTE:
Some PBS channels do not transmit clock setting data.
Press %� to move the highlight bar (arrow) to �INITIAL SET,� then press ENTER.
!
Select the D.S.T. mode.
Press ENTER to move the highlight bar to �D.S.T.,� then press %� repeatedly until the desired setting is selected. AUTO: Select if you want to adjust your VCR�s clock automatically by the incoming signal from the host channel. Be sure to select the correct time zone manually in step �. ON: Adjustment will be made by the built-in clock itself. OFF: Select when Daylight Saving Time does not apply to you.
�
Access the Clock Set screen.
Press %� to move the highlight bar (arrow) to �CLOCK SET,� then press ENTER.
Manual Clock Set
~
Set the time, date, and year.
�
Select the time zone.
Press ENTER to move the highlight bar to �TIME ZONE,� then press %� repeatedly until �AUTO� or the desired time zone is selected. Each time you press the button, the time zone changes as follows: O AUTO O ATLANTIC O EASTERN O CENTRAL O MOUNTAIN O PACIFIC O ALASKA O HAWAII O (back to the beginning)
Press %� to set the hour, then press ENTER. Set the date and year in the same way. � Press and hold %� to change the time by 30 minutes or the date by 15 days.
Ÿ
Select D.S.T. mode.
@
Press ENTER to move the highlight bar to �D.S.T.,� then press %� to select the desired setting. ON: Adjustment will be made by the built-in clock itself. OFF: Select when Daylight Saving Time does not apply to you.
Complete the Semiauto Clock Set.
Press SET UP to return to normal screen.
IMPORTANT
Turn off the unit after performing Semiauto Clock. �Auto� will appear on the front display panel while the clock is being set. The current clock time will appear automatically when the clock setting is complete.
!
Start clock.
Press SET UP and normal screen appears. To make corrections any time during the process Press ENTER repeatedly until the item you want to change blinks, then press %�.
14
|
|
|
> |
|