|
|
|
Categories
|
|
Information
|
|
Featured Product
|
|
|
 |
|
|
There are currently no product reviews.
 ;
The only reason I gave this less than 4 stars, is because it shouldn't take 24 hrs to have the download available. I was surprised to find that I had to wait until the next day to be able to download the manual that I paid for.
The manual itself is the correct manual.
 ;
Excellent replacement for original Owner´s Manual. I am totally satisfied!
;
Great service. Manual is as advertised and delivered when promised.
;
Perfect quality, highly appreciated service !!!
Fast delivery of the download info, no issues at all. Recommended E-manual shop !!!
;
hi owners manual- crew,
i am very satisfied about the trade with you.
if i need some other manuals, i will contact you again.
thanks
frank kappler
Instructions for attaching a VESA compliant arm
An arm or stand based on the VESA standard (commercially available) can be attached to the monitor. Procurement of the arm or stand is at the customer's discretion. When choosing the arm to be installed please take note of the following points. - The arm should be compatible with the VESA standard, and there must be a gap of 75 mm x 75 mm between the screw holes on the section to be attached. - The arm must not fall off or break off after being attached to the monitor. Note: - Do not overly bend the cable or add extension cords as this could lead to malfunction. 4.Attach the arm to the monitor with four screws.
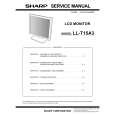
Note: - The screws used to attach the arm should be M4 screws with a length of 4 mm ~ 6 mm protruding from the surface to be attached. Using different screws could lead to malfunction or may lead to the monitor falling off, internal damaged, personal injuly.
4 - 6 mm
1.Turn off the power switch and remove the AC adapter from the monitor's power terminal. 2.Being careful not to damage the monitor, spread out a soft cloth and lay the monitor on it displayside down.
Screw used to attach arm Arm Part of monitor to which arm is attached 5.Connect the AC adapter to the monitor's power terminal.
3.Remove the four screws and then remove the stand from the monitor.
Notes: - The stand is specially made for use with this monitor. Once having removed the stand, never attempt to attach it to another device. - Once having removed the screws, store them together with the stand and if the stand is ever re-attached be sure to use the original screws. Using different screws could lead to malfunction. 20
|
|
|
> |
|