|
There are currently no product reviews.
 ;
Excellent printing quality. A complete and very useful manual with all details.
;
Even if the PDF is a scan, I can read the information I need.
The price is affordable and the service (mail sending) is very fast.
Thanks ! Regards. William (Fan of Kenwood)
;
Very good quality original datasheet!I like this amazing website!!!!!!
 ;
Excellent just what I needed to replace the electrolytic caps and make this old gem a beauty again. Was as scan of the original photocopied service manual.
;
It was helpful to get schematic with waveforms in important points and lot of service information. Manual is good quality, fast delivered. Of course it is hardcopy of paper one with all its disadvantages.
3-2
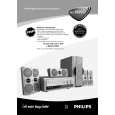
Dismantling of the DVD Module / shield bracket B1 1) Loosen screws D3 of botton chassis figure3.
2) Loosen 5 screws B and remove the B1. (figure 4) 3) Loosen 4 screws D (see figure 5) and 2 screws D1, then all connectors to remove the DVD module.
D1
Screw K1
Screw D3
D
Figure 3
B
B1
Figure 5
Figure 4
Dismantling the Power Amplifier Module
1) Pull out connected wires and Loosen 1 screws (see figure 6). 2) Loosen 10 screws on the Rear Panel - 4 screws K for the Speaker sockets (see figure7) - 4 screws K for the heat sink. - 2 screws K1 for the bottom chassis.(see figure 3)
Figure 6
|