|
|
|
Categories
|
|
Information
|
|
Featured Product
|
|
|
 |
|
|
There are currently no product reviews.
 ;
Manual was complete and available promptly, since I had lost my original manual. Very good response.
;
Whilst this is a photo copy, and some of the pages are a little askew, it was all readable and intact. A real bonus finding an old manual for a classic piece of kit that no other site had.
Great stuff.
;
excellent quality, contains circuits and scan quality, 110 pages
;
It was easy done, and I got exactly what I was looking for.
;
The manuel was exactly what I needed and I received it promptly. Thanks
Tiltable Plasma Display Wall-Mount Hardware: PDK-5006
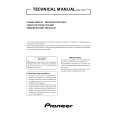
4.5.2 Assembling the mounting hardware and mounting the plasma display
1) Precautions � Make sure you distinguish correctly between vertical frames for left and right. Both should be mounted so their hexagonal sockets face outward. � The horizontal frames should be mounted so their smaller openings face the wall. A total of eight openings are provided in the horizontal frames for wall-mounting. (A total of fourteen openings are provided in the PDK-5006 itself.) 2) Assembly procedure 1 Loosen screw a and separate one end of the hook from the screw. 2 Hold the upper part of the vertical frame and open to an approximate width of 10 cm.
a
a
Loosen the screw until you can no longer see its end through this opening.
3 Mount the horizontal frame to the vertical frames.
Vertical frame (left)
Horizontal frame
Hexagonal socket head flange bolt This surface should face the wall.
Vertical frame (right) Hexagonal socket head flange bolt Hexagonal sockets facing outward Hexagonal socket head flange bolt Horizontal frame
This side should face the wall. (The smaller holes should face the wall.) Hexagonal socket head flange bolt
Hexagonal wrench
Positioning the screw with a finger-tip, tighten the screw with a hexagonal wrench.
50
|
|
|
> |
|