|
|
|
Categories
|
|
Information
|
|
Featured Product
|
|
|
 |
|
|
There are currently no product reviews.
 ;
This was a hard to find manual. When I did find it , some sites wanted way too much for the file.
Owner-manual .com had it for a really reasonable price. Not only that but it was sent very quickly and was a quality scanned document, unlike some others I purchased from a different site.
Good job guys!!
Larry
;
Fast and courteous service. Product delivered as described. Thank you.
;
Last week I bought a second hand Panasonic AG-7500 SVHS Hi-Fi Video Cassette Recorder. It is a professional machine with many video and audio options. I feared it would be a huge quest to find a manual. I was delighted when I found owner-manuals.com. After payment I received the file to download the next day already. The quality is great. I am very happy. Thanks!
;
The owner's manual/operating instructions that I purchased was the original factory document and it was in at least three and maybe more languages. I no longer have it because I sold the tape recorder and included the owner's manual/operating instructions and a service/repair manual that I bought on ebay for the new owner.
;
This manual is very useful. Because pioneer sx-q180 is unhandy to use without manual.
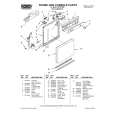
For models with more than three buttons: Push a Cycle Selector button for the desired
cycle. Use any Cycle Selector button with the Rinse 8 Hold cycle. The Cycle Control knob determines which cycle operates. 3. Turn the Cycle Control knob clockwise to point to the desired cycle. See page 8 for cycle descriptions. You will feel a definite stop at each cycle mark. The dishwasher will automatically start the cycle you selected. NOTE: lf the door is latched, you will hear cycles start and stop as the knob passes each cycle mark. Thii is normal and will not hurt the dishwasher. lf you prefer, you can set cycles with the door unlatched. Cyclem may vary with models
Adding
a dish during
a cycle
(model series WU3000 and WU4000, WUS750)
You can add an additional item to the dishwasher anytime before the Cycle Control knob reaches LIGHT WASH. See page 8. 1. Lift up on the door latch to unlatch the Wait 30 seconds for air in the dishwasher door and stop the cyde. Wait a moment to warm up. This helps reduce the for the spray action to stop before openamount of moisture that can come from ing the door. the vent when restarting the cycle. 2. Cpen the door and add the dish. 4. Press door in to latch it. The dishwasher 3. Close the door. Do not latch It. will start where it stopped.
Changing
a cycle
setting
(model series WU3000 and WU4000, WU5750)
You can change a setting anytime during any cycle. 1. Lii up on the door latch to unlatch the NOTE: Turning the Cycle Control knob door and stop the cycle. may cauw the covered section of the 2. Turn the Cycle Control knob clockwise to detergent dispenser to open. Be sure to the cycle you want. fill the covered section, and dose the 3. Check the detergent dispenser to be sure cover, if the cycle uses detergent in it is properly filled for the new cycle. See both sections. page 10. 4. Close and latch the door. The dishwasher will automatically start the new cycle.
Canceling
a cycle
You can cancel a cycle anytime during the cycle. 1. Turn the Cycle Control knob &My 2. Let the dishwasher drain completely. clockwiie to the drain portion of the wash 3. Lii up on the door latch to unlatch the or rinse. You will hear water draining door. when you have advanced to the proper 4. Turn the Cycle Control knob dockwise to location. point to OFF. 7
|
|
|
> |
|