|
|
|
Categories
|
|
Information
|
|
Featured Product
|
|
|
 |
|
|
There are currently no product reviews.
 ;
Great price, Quick delivery, the document was very usefull A+++++++++++++++
;
Thank´s for your help, I already recived these manual from you
;
Thank you for your manual It has the basic things to and i use the Oszi for Longer Time.
THX
;
Actually, I was looking for this information for 3 years!...now thanks to you, the manual is on my hands and of great help, cause I understand now where I was doing wrong connections and wires...excellent, I'll be back to you if in need, thank you.
 ;
This manual covers the main equipment features only. While it also includes the procedure for saving and loading from the now long obsolete memory cards it does not mention the how to operate with the optional floppy drive interface so I am still at a loss about how to use this! Note that there is a separate manual covering the MIDI interface and programming via the keyboard, not included in this download. You will also need to get hold of this if you want to use the MIDI interface properly. Basically there is little difference between this manual and the free to download manual for the similar PR60 model.
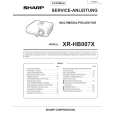
Anpassen des projizierten Bildes (Menü �Bildwand�)
Menübetrieb n Seite 37
Bild Bildwand 0 0 Aus Ein Logo Ein Vorne Deutsch OK AUS Option Normal Hilfe
1 2 3 4 5 6 7 8
Grö�e ändern Bildversch. Tra.-Entz. Auto-Trapez OSD-Anzeige Hintergrund Setup-Anleitung PRJ.-Mod. Sprache(Language) W�./EINS.
* �Auto-Trapez� kann nur bei Verwendung von XR-20X eingesetzt werden.
1 Auswählen des Grö�enänderungs-Modus
Hinweis
� Einzelheiten zum Grö�enänderungs-Modus finden Sie auf den Seiten 32 und 33. � Sie können den Grö�enänderungs-Modus auch mit der H RESIZE-Taste auf der Fernbedienung auswählen. (Siehe Seite 32.)
3 Schrägprojektionskorrektur
Wenn das Bild entweder von oben oder von unten seitlich projizier t wird, ist das Bild trapezförmig verschoben. Die Funktion zur Korrektur dieser trapezförmigen Verschiebung wird als Schrägprojektionskorrektur bezeichnet.
a Bei Verwendung von XR-20X
Für Auto-Trapezkorrektur
2 Anpassen der Bildposition
Sie können das projizier te Bild senkrecht verschieben.
Setzen Sie im Menü �Bildwand� die Option �Auto-Trapez� auf �Ein�.
Für manuelle Trapezkorrektur
Setzen Sie im Menü �Bildwand� die Option �Auto-Trapez� auf �Aus�, wählen Sie �Tra.-Entz.�, und passen Sie die Einstellung mit dem Schieberegler an. Manuelle Korrektur
Q oder P Taste O oder R Taste
O Taste
Q Taste
Nützliche Funktionen
a Bei Verwendung von XR-20S, XRHB007X oder XR-10S Wählen Sie �Tra.-Entz.� im Menü �Bildwand� und stellen Sie mit dem Schieber ein.
Hinweis � Sie können diesen Punkt nicht einstellen, wenn �Grö�e ändern� auf �Normal� gestellt ist.
Siehe Seite 31 für Einzelheiten zur Trapezkorrektur.
Hinweis
� Die Schrägprojektionskorrektur mit der �AutoTrapez� bis zu einem Winkel von ca. ± 13 Grad angepasst werden, mit der manuellen �Tra.Entz.� bis zu einem Winkel von ca. ± 13 Grad. (wenn �Grö�e ändern� auf �Normal� gesetzt ist)
41
|
|
|
> |
|