Actually, I was looking for this information for 3 years!...now thanks to you, the manual is on my hands and of great help, cause I understand now where I was doing wrong connections and wires...excellent, I'll be back to you if in need, thank you.
This manual covers the main equipment features only. While it also includes the procedure for saving and loading from the now long obsolete memory cards it does not mention the how to operate with the optional floppy drive interface so I am still at a loss about how to use this! Note that there is a separate manual covering the MIDI interface and programming via the keyboard, not included in this download. You will also need to get hold of this if you want to use the MIDI interface properly. Basically there is little difference between this manual and the free to download manual for the similar PR60 model.
Nothing wrong with the manual or the delivery - came to me the same day I ordered it. But afterwards I realized that I ordered the wrong manual. Probably better with the Quick start - version. So maybe it would be better if we could see a list with inhold for each manual before ordering?
Text excerpt from page 8 (click to view)
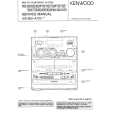
Building in
SR A SR R R A SR SR
58
0
5
1
0
580
51
0
Fig. 9
A = Auxiliary burner SR = Semirapid burner R = Rapid Burner These hobs can be inserted in a built-in kitchen unit whose depth is between 550 and 600 mm. The hobs dimensions are shown in Fig. 9.
Fitting the lid
We recommend the lid hinge block are fitted before installing the hob into the worktop.
To install the lid onto the hob, proceed as follows: a. Remove the right and left hand grid blocks fitted to the back of the hob, by unscrewing the relevant screws (Fig. 10) b. Fit the lid hinge blocks onto the hob, using the original screws, ensuring that the relevant shims are fitted between the hinge blocks and the hob (Fig. 10); c. Fit the left hand lid hinge (marked S) into the hinge block (Fig.11); d. Carry out the same operation with the right hand lid hinge (marked D).
FO 2035
Fig. 10
Adjusting the lid balance
To adjust the lid balance, turn clockwise or anticlockwise the central screw of the right- and left-hand hinges (Fig. 12).